Oreo Tiramisu with Extra Chocolate Layer (No-Bake Dessert)
If you love Oreo desserts, chocolate, and classic tiramisu, this recipe is the best of all worlds.
This Oreo Tiramisu with an extra chocolate layer is rich, creamy, and indulgent without being overly sweet. It’s a no-bake dessert, perfect for make-ahead occasions, cozy weekends, or when you want something impressive with minimal effort.
What makes this version special is the extra chocolate layer in the middle, which adds depth, richness, and a smooth contrast to the Oreo cream. The flavors settle beautifully overnight, making it taste even better the next day.
Why This Oreo Tiramisu Works So Well
- No oven required
- Balanced sweetness (not overly sugary)
- Creamy mascarpone + Oreo texture
- Rich chocolate layer for extra indulgence
- Perfect make-ahead dessert
- Beginner-friendly and fail-proof
Ingredients
For the Biscuit Layers
- Ladyfinger biscuits
- Espresso mixed with a little water (cooled)
Tip: Espresso gives depth and balances the sweetness. If you prefer mild coffee flavor, dilute it slightly with water.
For the Oreo Cream Layer
- Mascarpone cheese
- Schlagsahne (whipping cream)
- Sugar (adjust to taste)
- Oreo biscuits (crushed)
For the Chocolate Layer
- Cooking chocolate
- Butter (small amount, for smooth melting)
For Garnish
- Crushed Oreo biscuits (for topping & decoration)

Step-by-Step Method
Step 1: Prepare the Espresso
Prepare espresso and mix it with a little water.
Let it cool completely before using.
⚠️ Important Tip:
Do not soak ladyfingers for long. Dip them for 1 second on each side only. Over-soaking will make the dessert soggy.
Step 2: Make the Whipped Cream Base
In a mixing bowl, add:
- Mascarpone cheese
- Whipping cream
- Sugar (according to taste)
Whisk until thick, smooth, and creamy.
💡 Extra Tip for Perfect Cream:
Place the bowl and whisk in the refrigerator for 10–15 minutes before whipping. Cold tools help the cream whip faster and hold its shape better.
Step 3: Add the Oreos
Crush Oreo biscuits using:
- A rolling pin
- Or a hand mixer
Gently fold the crushed Oreos into the whipped cream using a spatula.
Do not overmix — keep the texture light and airy.
Step 4: Prepare the Chocolate Layer
In a small pan or microwave:
- Melt cooking chocolate
- Add a little butter
Mix until smooth and glossy.
Let it cool slightly so it doesn’t melt the cream layer.
Layering the Oreo Tiramisu
This is where the magic happens ✨
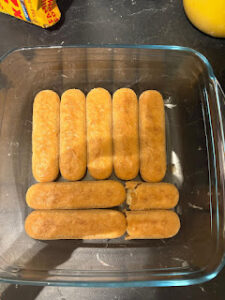
1️⃣ First Layer
Arrange espresso-dipped ladyfingers at the bottom of the dish.
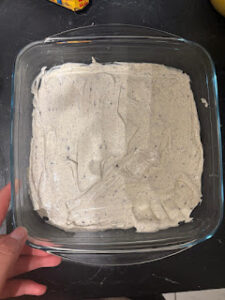
2️⃣ Second Layer
Spread half of the Oreo whipped cream evenly over the biscuits.
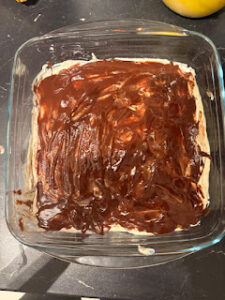
3️⃣ Third Layer (Chocolate Layer)
Pour and spread the melted chocolate evenly on top of the cream.
4️⃣ Fourth Layer
Add another layer of espresso-dipped ladyfingers.
5️⃣ Fifth Layer
Spread the remaining Oreo whipped cream smoothly.
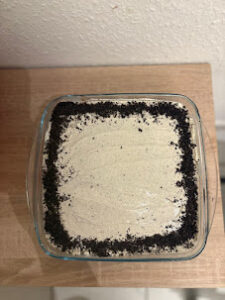
6️⃣ Garnish
Decorate with crushed Oreo biscuits.
You can:
- Sprinkle evenly
- Trace around the edges
- Create a border like in the photo
Chill Time (Very Important!)
Cover the dish and refrigerate overnight (or at least 6–8 hours).
⏳ Why overnight chilling matters:
- Layers settle properly
- Flavors blend beautifully
- Texture becomes firm and sliceable
This dessert tastes much better the next day.
Serving Suggestions
- Serve well chilled
- Perfect as a dinner dessert
- Great for gatherings, Eid, birthdays, or cozy weekends
- Pairs beautifully with coffee or tea
Pro Tips for Best Results
- Do not oversoak ladyfingers
- Chill bowl & whisk before whipping
- Adjust sugar based on Oreo sweetness
- Use good quality chocolate for richer flavor
- Always chill overnight for best texture
Final Thoughts
This Oreo Tiramisu with Extra Chocolate Layer is the ultimate cozy dessert — creamy, chocolatey, and incredibly satisfying. It’s easy enough for beginners but elegant enough to serve guests.
If you love no-bake desserts and layered sweets, this recipe deserves a spot in your favorites 🤍